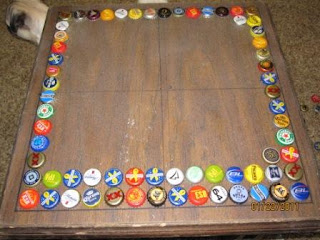
Well, I will start off by saying that this little project has been a LONG time coming! Sometime within the past year (possibly/probably longer), I noticed a similar project in a facebook "friends" photo album. A friend that I have never met face-to-face, just through the facebook/Jo-Ann Fabric & Crafts "World"!
I complimented her work and told her we were starting our own collection of tops. This EXTREMELY KIND & GENEROUS person asked for my address and shipped me a giant gallon ZipLoc bag full of all sorts of cool bottle caps! My (then) 4-year-old was in heaven - she would sort those things for HOURS!
At this point, I shared the project with my very handy husband. He wanted to do a pattern - I wanted to do it random. We bought a small end-table at a yard sale. The end-table sat alone on the porch for a few (or more) months. Our big TV went out so we used the end-table to hold a TV in the living room........you get the picture, right? . . . . . . . .
Yesterday, I decided to work on the project. I had some pent up anger. I had been directed on how to do this craft - I thought I would get to use a hammer, finishing nails & needle-nose pliers - my husband said "no".
This is what we did:
FIRST:
Collect Your Bottle Caps:
While consuming beverages of your choice, you'll need to be considering your table top medium. Do you wanna go BIG first or start small. I opted to start small so that I didn't get overwhelmed & freak out.
The table I did is 14 bottle caps x 14 bottle caps, so 196 caps in all.
For $3, at a yard sale, this is the table I selected:
You'll have to appreciate the comestic flaws. . . . I think they pair nicely with the bottle caps.
Plus, a sanding sponge & some spray paint can work some crazy magic!!
You might think the tabletop looks dusty - it's not - it the Commercial Grade Spray Adhesive that my hubby saturated on there before we (my 5-year old & I) started placing the caps. It created a "sticky" that was just a little heavier than what you'd consider "tacky". It securely held the caps in place but I could still change my mind if needed. Maybe you can see the haze of the adhesive better in this picture:
Okay, now that you've seen the adhesive haze - you'll notice the center line. It's not really necessary. We learned that the hard way - but it did end up being a good mistake! We did mark the outside line to install trim the outside edges (trim itself not pictured).
Next you will start placing your caps - working on the outline first, like a puzzle. You'll have to get the spacing right and then follow your placement accordingly.........
And so on & so forth...........
Until you fill your space:
So, at this point we originally planned to just install the trim, paint & fill with epoxy. Then I noticed the center line mistake! When I whined to my wonderful, amazingly handy husband about it he said "no problem, don't worry." He placed the trim, went out to his "room" came back with a can of satiny/glossy black paint, pulled out a medicine dosing syringe and came to my rescue. See below:
He started filling each & every space with the pretty black paint. How perfect is he!?!
And handsome, too ♥ It was oil based paint so I wanted NO part of it.
This is how it looked after fill-in:
Next, the trim is painted:
Now, we are waiting for the inside layer of paint to completely dry. Once it is dry I will go find & buy the epoxy to fill it with. I will add that info once I make it to that step.
For now, me and my Miss K are admiring our work thus far:
And I am off to "the room" to see about that sanding sponge and black spray paint!
Time to get busy finishing up the base & legs!
TO BE CONTINUED. . . . . .
.........3 WEEKS LATER
Here is the epoxy we bought - we should have bought the BIG BOX
{{PICS COMING SOON}}
.........3 WEEKS LATER
Here is the epoxy we bought - we should have bought the BIG BOX
and now it looks like this:


