Tuesday, May 3, 2011

Springtime Bird Treats!


Got busy little hands?  Busy little minds? 
A nice Spring day?

This quick and easy project can be done in less than 30 minutes!
Not only is it SUPER EASY, it is fun to do and your busy little one(s) will love
watching the various birds come in to enjoy this tasty wildlife treat!


You'll only need a few things:

Pine Cones
Peanut Butter
(you can also use lard or lard & honey)
Butter Knife or Spoon
Bird Seed
Plate/Open Dish
Yarn/string
Scissors


STEP 1/PREP:

Cut yarn about 18-24".
Tie it around the LARGE end of the pine cone,
leaving you with 2 equal amounts of yarn to hang the cone from.
Pour seed into a plate or some sort of open dish (we just used a paper plate)

STEP 2:

Spread peanut butter on pine cone
Nothing fancy, just smear it & go with it.
Perfection is NOT required on this!!


STEP 3:

Roll peanut butter smeared pine cone in the bird seed.  If needed, use your hands to pour seed into the spots that you can still see the peanut butter exposed.

STEP 4:

Find a shady spot to hang your completed Springtime Bird Treat!!


Saturday, April 23, 2011

Butterscotch Bird Nests


A simple, fun & tasty treat - perfect for Easter!

4 cups Chow Mein Noodles
1 cup peanuts
2 cups butterscotch morsels
1 cup peanut butter
2 tsp honey
1 tsp vanilla
jelly beans

Pour chow mein noodles and peanuts in a very large mixing bowl.  In a separate bowl, heat butterscotch, peanut butter and honey in microwave on 30 second intervals.  Stirring between each interval.  Once melted stir in vanilla.  Pour over noodles and peanuts, combine well.

Next, lay out wax paper. You can either drop the mixture onto the paper to form "haystacks" or use 2 spoons to shape mixture into little nests.  Allow to cool & set for 2-4 hours.  Add jelly beans to nests for a fun Easter themed treat!


Wednesday, April 13, 2011

Tuscan Grilled Organic Chicken & Sauteed Vegetable Medley


In an ongoing effort to eat healthy, my AMAZING husband created this fantastic meal in practically no time at all!  This quick & easy dinner will hit all of the musical notes in your mouth!

ALL YOU NEED IS THIS:

For the Chicken
1-2 lbs. Organic Boneless Skinless Chicken Breast, Pounded (we like Publix Greenwise)
1 cup Kraft Tuscan House Italian Dressing & Marinade
Salt & Pepper (optional)

For the Vegetable Medley
3-4 zucchini, cut into large chunks
1 vidalia onion, sliced
1 red pepper, seeded & sliced
1-2 Tbsp olive oil
salt & pepper as desired

Combine the chicken & the marinade in a large Ziploc type bag.  Let marinate for 30 minutes or more in fridge.

Once you get your grill going and the chicken on you can start on the veggies.  Don't overcook your chicken, 4-5 minutes /side is usually enough time but use a meat thermometer to be sure.  Or, if you're lucky like me, your husband knows all about perfectly cooked chicken : )

In a large skillet or saute pan, pour olive oil add vegetables & onions and combine with salt & pepper until everything has a touch of oil on it.  If needed you can add a little more oil or a small amount of reduced sodium chicken stock.  Cook until onions are translucent, add red bell pepper. Cover and cook for 2-3 more minutes.  If you like your veggies cooked more you can continue to cook but just remember that the higher the temp, the more vitamin loss from the veggies. 

Did you know that a red bell pepper has more Vitamin C than an orange?  Well, now you know!

WANNA MIX IT UP?  Sub red onion for vidalia and add yellow squash instead of red bell pepper.
This will give you lots of color on the plate!

Monday, April 11, 2011

Fruits and Veggies and $100 Visa Gift Card Giveaway

For a chance to win a $100 VISA gift card visit the link below!  This giveaway thru the blog Jamie Cook's It Up & is sponsored by BlogHer and Tropicana!  Go check out some fantastic recipes & enter for your chance to win!!

http://jamiecooksitupreview.blogspot.com/2011/04/fruits-and-veggies-and-100-visa-gift.html?showComment=1302527137233#c8552381388233941201

Thursday, April 7, 2011

Beer Bread!

It's been crazy around here!  The kids are on Spring Break and I feel like the only things I manage to get done are the things that I NEED to get done and not the things I WANT to do or get done!  And, such is life....I guess!

Anywho!  My sweet Aunt Charlie recently shared a super easy bread recipe with me - Beer Bread!  I know what you're probably thinking "Bread?  Who has time to bake bread?"  YOU DO!


You only need 3 ingredients & here they are:

3 CUPS self rising flour
2-3 TBSP Sugar
12 oz Beer (I used a Miller High Life)

Preheat oven to 375 degrees.  Spray (or grease & flour) a 8"x 4" loaf pan.

Combine the dry ingredients (flour & sugar) & add the beer.  Combine until everything is wet, pour into a loaf pan and put it in the oven for 40-45 minutes.

Remove from pan and cool on rack.  

I could not wait to try the bread...so I cut off an end slice and smeared a little butter over it - YUM! 

What are you waiting for??  Go try it!!  Just don't take the last beer ; )


Saturday, February 26, 2011

Blackberry Wine Cake


Pin It


ingredients

for the cake:
1 box Duncan Hines white cake mix
1 cup canola oil
1/2 c chopped pecans
1 small box blackberry Jell-o (I like to use Blackberry Fusion flavor)
1/4 c blackberry jelly, microwaved for 15-20 secs
4 eggs
1 c blackberry wine

for the "pour" & glaze:
1 stick butter
1 c confectioners sugar
1/2 cup blackberry wine

preheat oven to 350.  Spray bundt (or similar) pan with Baker's Joy OR grease & flour your pan.  Sprinke chopped pecans around bottom of pan.  Mix all ingredients and gently pour into pan.  Tap to remove any air bubbles & bake for 35-40 minutes, until top is golden and cake is done.

When cake has about 10-15 minutes remaining, prepare the pour & glaze.  Melt butter over low heat.  Add wine & sugar.  Heat until sugar has melted and no clumps are remaining.

Once you remove cake from oven, immediately (delicately) poke holes in the cake using a fork and pour 3/4 of the mixture into the cake WHILE CAKE IS STILL IN THE PAN.  Let it sit & soak for 30 minutes (or more).  Once you turn the cake out, drizzle glaze over top. 

WANNA MIX IT UP?  This cake can be made using strawberry wine & strawberry Jello in place of anything blackberry.  If you wanna "jazz" up the presentation, you can reduce blackberries or strawberries with some sugar & add a little to each slice or use with the presentation of the entire cake before serving.


what you will need:                           


spray pan with Baker's Joy.


sprinkle chopped nuts along bottom of pan, set aside.....


prepare cake ingredients in large mixing bowl


mix well......


really well...... until smooth


gently pour into bundt/tube pan.


when cake has 10 minutes to go,
melt butter over med/low heat


once melted, add powdered sugar & wine
heat until no lumps appear and sugar is dissolved.
you'll be tempted to taste this - it's pretty tasty!
(just don't burn your tongue)


remove cake from oven & gently poke holes into cake with fork.
Gently pour 3/4 of the mixture into/onto the cake.
Let the cake sit for 30 minutes, or more to soak up the yummy sauce.


once it has soaked up all of the goodness & sat for at least 30 minutes,
invert onto dish..... 

& drizzle with remaining glaze.


go ahead and have a slice while it's still warm : )
enjoy with an ice cold glass of milk.


now that isn't the most sophisticated picture,
BUT I could hardly wait any longer to give it a taste

ENJOY!! 

Tuesday, February 15, 2011

Crustless Ham & Swiss Quiche


what you'll need (ingredients):


  • 1 1/2 tablespoons plain bread crumbs (toasted bread works well)


  • 1 cup chopped or sliced onions - however you like them


  • 1 cup sliced, then chopped cooked ham, I use Hormel Natural - No Nirtrates (1/4 pound)


  • 1 tablespoon unsalted butter


  • 1 (8-ounce) package shredded Swiss cheese (2 cups)


  • 4 large eggs


  • 2 cups half & half (or 1 c. heavy cream & 1 c. whole milk)


  • 1/2 tsp black pepper (to taste)


  • dallop of sour cream (optional)


  • what you'll do:
    Preheat oven to 425°F with rack in middle.
    Butter 10" quiche dish/tart pan/large pie plate, then sprinkle all over with bread crumbs.
    Cook onions with ham in butter in a 12-inch heavy skillet over medium-high heat, stirring occasionally, until pale golden, about 5 minutes. Spread in dish, then evenly sprinkle cheese on top.
    Whisk together eggs, cream, milk, sour cream and 1/2 teaspoon pepper and pour over cheese. Bake until top is golden and custard is set in center, 20 to 25 minutes. Cool slightly before cutting into wedges.

    If you do not like swiss, you can use any cheese you prefer - swiss cheese does have a love/hate relationship.

    NOTE:  Do not feel "obligated" to salt this at ANY point.  Between the ham & the cheese, salt is not necessary.  Too much sodium is a bad thing.  So just leave it alone!  Your heart will thank you : )

    I prefer this cold & it tastes better after about 6 hours of chilling.

    WANNA MIX IT UP?  Cheeseburger quiche can be easily adapted following these same steps, using cooked ground beef & cheddar cheese in place of ham & swiss!!

    WARNING:  Can be habit forming! 


    you'll need these items:

    first step is to toast your bread if you're making your own bread crumbs.....

    then chop, dice & shred:


    butter your quiche dish & dust/sprinkle the bread crumbs around the pan.
    my lovely daughter shows ours off......


    next you'll heat the skillet, melt butter, add the ham & onions
    and saute until transparent and soft:


    while the mixture is cooking, grab a large bowl.
    combine eggs, half & half, sour cream & pepper.
    whisk your worries away.....keep whisking....


    once cooked, use a paper towel & remove any excess liquid from the pan.
    gently pour/spread mixture in pan as pictured below:
    (be mindful of your breadcrumb coating)


    now, sprinkle the cheese all around
    (good grief that's A LOT of cheese, so much I forgot to photo it!)
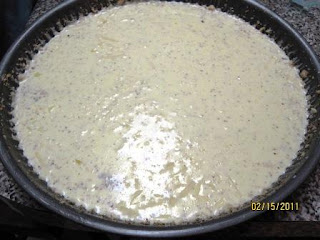
    and then slowly pour in your egg mixture, like so:


    place this into your pre-heated oven & bake for 20-25 minutes.........
    wait until the edges are a golden brown and the center is set.

    end result:


    Sunday, January 23, 2011

    The Bottle Cap Project


    Pin It


    Well, I will start off by saying that this little project has been a LONG time coming!  Sometime within the past year (possibly/probably longer), I noticed a similar project in a facebook "friends" photo album.  A friend that I have never met face-to-face, just through the facebook/Jo-Ann Fabric & Crafts "World"! 
    I complimented her work and told her we were starting our own collection of tops.  This EXTREMELY KIND & GENEROUS person asked for my address and shipped me a giant gallon ZipLoc bag full of all sorts of cool bottle caps!  My (then) 4-year-old was in heaven - she would sort those things for HOURS! 

    At this point, I shared the project with my very handy husband.  He wanted to do a pattern - I wanted to do it random.  We bought a small end-table at a yard sale.  The end-table sat alone on the porch for a few (or more) months.  Our big TV went out so we used the end-table to hold a TV in the living room........you get the picture, right? . . . . . . . .

    Yesterday, I decided to work on the project.  I had some pent up anger.  I had been directed on how to do this craft - I thought I would get to use a hammer, finishing nails & needle-nose pliers - my husband said "no". 

    This is what we did:


    FIRST:

    Collect Your Bottle Caps:

    While consuming beverages of your choice, you'll need to be considering your table top medium.  Do you wanna go BIG first or start small.  I opted to start small so that I didn't get overwhelmed & freak out. 
    The table I did is 14 bottle caps x 14 bottle caps, so 196 caps in all. 

    For $3, at a yard sale, this is the table I selected:


    You'll have to appreciate the comestic flaws. . . . I think they pair nicely with the bottle caps. 
    Plus, a sanding sponge & some spray paint can work some crazy magic!!

    You might think the tabletop looks dusty - it's not - it the Commercial Grade Spray Adhesive that my hubby saturated on there before we (my 5-year old & I) started placing the caps.  It created a "sticky" that was just a little heavier than what you'd consider "tacky".  It securely held the caps in place but I could still change my mind if needed.  Maybe you can see the haze of the adhesive better in this picture:


    Okay, now that you've seen the adhesive haze - you'll notice the center line.  It's not really necessary.  We learned that the hard way - but it did end up being a good mistake!  We did mark the outside line to install trim the outside edges (trim itself not pictured).

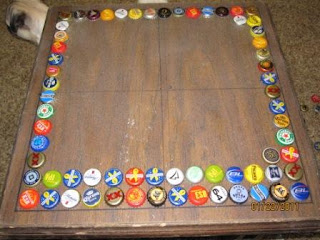
    Next you will start placing your caps - working on the outline first, like a puzzle.  You'll have to get the spacing right and then follow your placement accordingly.........


    And so on & so forth...........


    Until you fill your space:


    So, at this point we originally planned to just install the trim, paint & fill with epoxy.  Then I noticed the center line mistake!  When I whined to my wonderful, amazingly handy husband about it he said "no problem, don't worry."  He placed the trim, went out to his "room" came back with a can of satiny/glossy black paint, pulled out a medicine dosing syringe and came to my rescue.  See below:


    He started filling each & every space with the pretty black paint.  How perfect is he!?!
    And handsome, too ♥ It was oil based paint so I wanted NO part of it.

    This is how it looked after fill-in:


    Next, the trim is painted:


    Now, we are waiting for the inside layer of paint to completely dry.  Once it is dry I will go find & buy the epoxy to fill it with.  I will add that info once I make it to that step. 

    For now, me and my Miss K are admiring our work thus far:


    And I am off to "the room" to see about that sanding sponge and black spray paint! 
    Time to get busy finishing up the base & legs!

    TO BE CONTINUED. . . . . .

    .........3 WEEKS LATER

    Here is the epoxy we bought - we should have bought the BIG BOX


    and now it looks like this:


    {{PICS COMING SOON}}


    Thursday, January 20, 2011

    3-Bean Confetti Salad


    Looking for a "punch" of protein?  This salad will make you smile!  Eat alone, as a side-dish or chow down with corn chips!  It's packed with flavor and can be modified to satisfy any craving!!!

    3-Bean Confetti Salad

    1 can, Reduced Sodium Black Beans, drained & rinsed
    1 can, Reduced Sodium Pinto Beans, drained & rinsed
    1 can, White Beans (I used Canary Beans, see pic), drained & rinsed
    1/3 cup Red Wine Vinegar
    1 Tbsp. Olive Oil (for drizzle)
    1 Med. Sweet Vidalia or Red Onion Diced or Chopped (whichever & however you prefer)
    1 Big Handful of Diced Banana Peppers (the more, the merrier)
    1-2 Tbsp. Diced Jalapenos
    Salt & Pepper to taste

                                                                   What You'll Need:


    NEXT STEP:

    Drain & Rinse the beans - don't need the salty, sodium filled glaze.....

    (I like how they're kinda shaped like a ♥....)
    "beans, beans, they're good for your heart.
    beans, beans, they'll make you ......." 


    MOVING ON:

    Chop Onions & Banana Peppers & add Jalapenos


    LAST STEP:

    Add Vinegar, Olive Olive, Salt & Pepper & Combine All Ingredients


    ENJOY!!!


    WANNA MIX IT UP? 
         Add Fresh sliced tomato or chopped red or yellow bell peppers!  

    BONUS TIP:  
         Add a can of Garbanzos & Blend in food processor w/ Olive Oil and make Hummus!! 
         Serve with Wheat Thins for a healthy snack!